tauclock primer
primer: a short informative piece of writing.
figure 1:
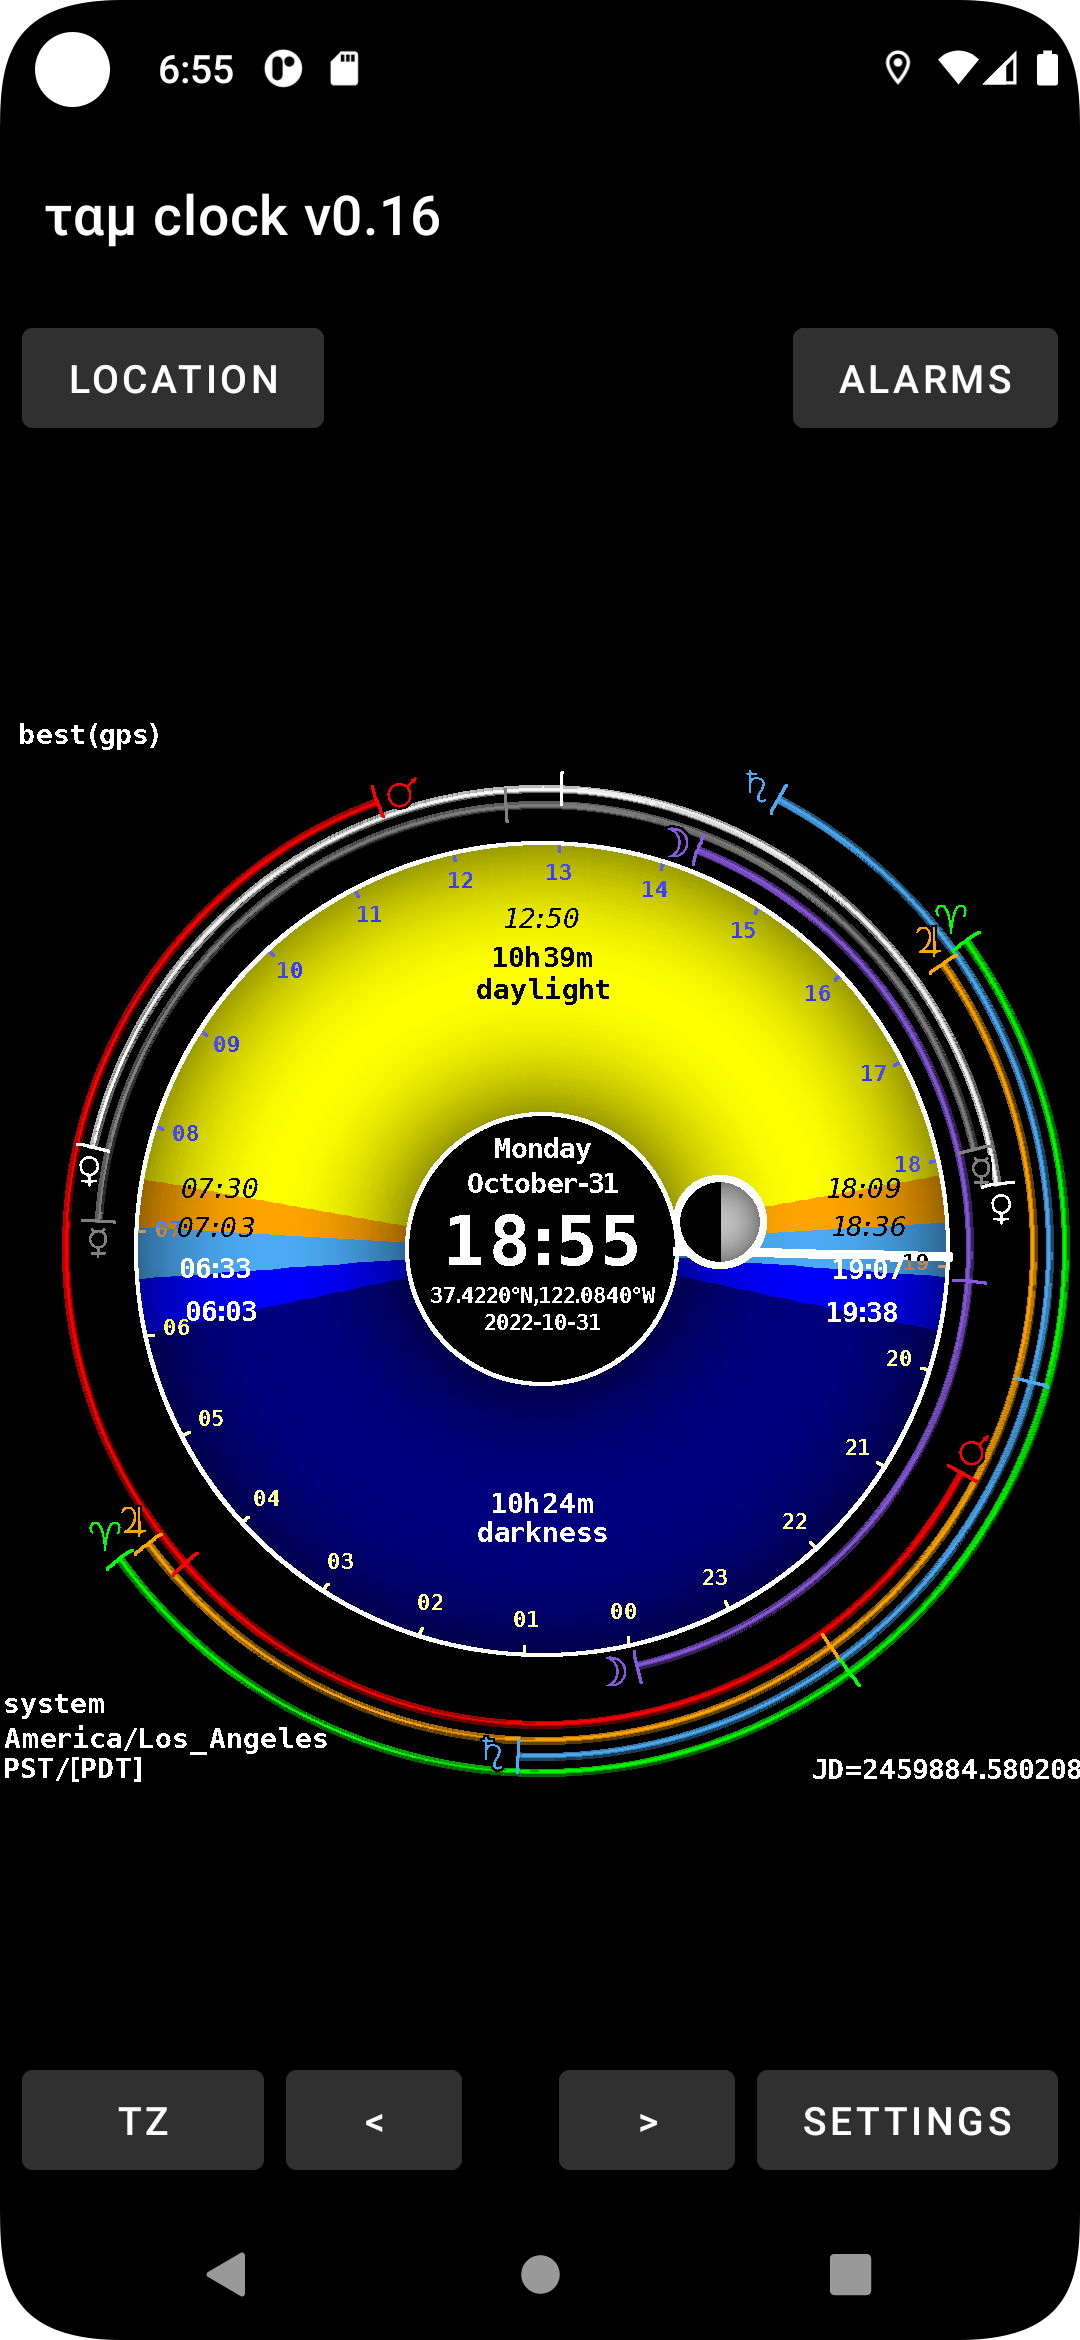
figure 2:
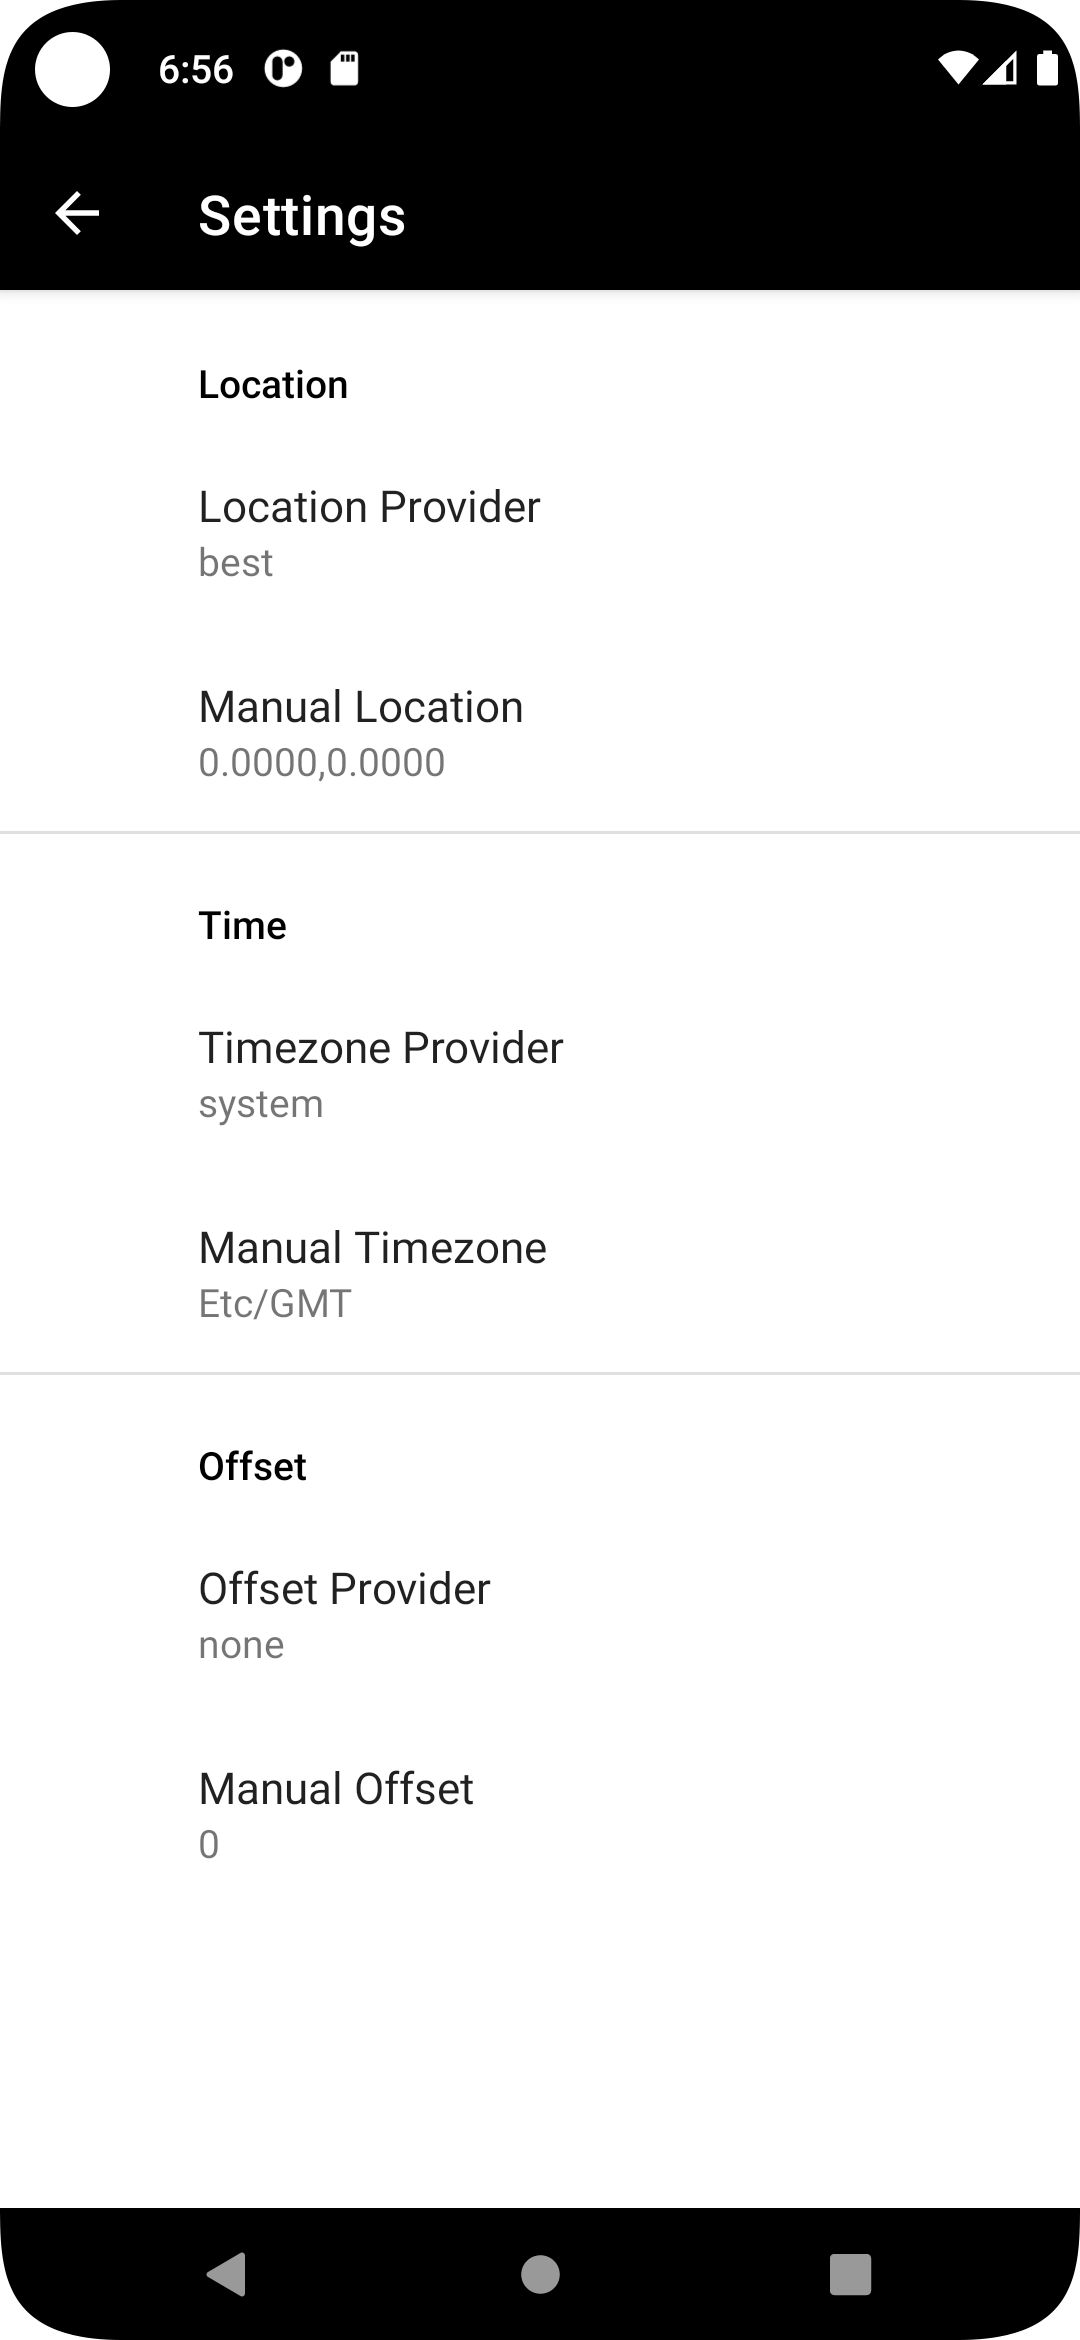
figure 3:
 This is a primer for tauclock v0.16
It is designed to be viewed on a small display in landscape mode
The left and right halves of this page should be able to scroll
vertically independant of each other.
please refer to figure 1 on the left
tauclock uses a 24 hour clock, with hours
numbered from 00 (midnight, or 12:00 am)
to 23 (11:00 pm)
The very center of the clock shows the current
time in the currently selected timezone. In
this case 18:55, or 6:55 PM.
Above the current time is the weekday name,
as well as the month name and day.
Below the current time is the current location
latitude and longitude, as well as the ISO8601
representation of the date.
This clock has only one hand, the "now hand",
indicating the current time. This is a solid
white line, which in this example appears
horizontally to the right, from the inner
white circle to the outer white circle.
Along the inside edge of the outside circle
are small numbers and ticks indicating the
hours.
The section between the inner circle and
outer circle is partitioned into various
colors.
- Yellow indicates daylight,
when the Sun is above the horizon.
- Orange indicates civil twilight, when the
Sun is just below the horizon.
This is
generally considered bright enough for
most people to see well without help.
- Light Blue indicates nautical twilight.
This is the period of time sailors
can begin to take readings from the
brightest stars.
- Medium Blue indicates
astronomical twilight.
During this time,
most casual observers would regard the
sky as fully dark, especially under
urban or suburban light pollution.
- Dark Blue indicates complete darkness.
Printed times at color transitions indicate when transitions
will occur. In this example, the morning transition from
orange to yellow, indicating Sunrise, occurs at 07:30.
A printed time also appears at the top of the dial, indicating
when the Sun will be at its highest point, or "transit"
These printed times may be in italic text, indicating they
occurred in the past (within the 12 hours before the "now hand")
or in bold text, indicating they will occur in the future
(within the 12 hours after the "now hand").
Hours and minutes of daylight and darkness are also given.
Just outside the inner circle is a depiction of the phase of
the Moon. During the course of the Lunar month, this depiction
will travel clockwise around the inner circle. If it is on the
right side, as in this example, it is "waxing" (getting bigger),
and if it is on the left side it is "waning" (getting smaller).
If it is generally above the inner circle it is "crescent", and
if it is generally below the inner circle it is "gibbous" (Latin for "hump").
New Moon occurs when the depiction is directly above the inner
circle, and Full Moon occurs when the depiction is directly
below the inner circle.
If the Moon is above the horizon, it will have a white ring around
it, as shown in this example. If it is below the horizon, the ring
around the moon will be a dark gray.
Outside the outer circle are a series of colored arcs depicting the rise, transit,
and set times of various visible bodies. Starting from the inside
and working out, they are:
- Purple for the moon
- Gray for Mercury
- White for Venus
- Red for Mars
- Orange for Jupiter
- Light Blue for Saturn
- Green for the first point of Aries, which
is a sort of astronomical landmark.
Traditional astronomical symbols for these objects appear alongside the arcs,
in the appropriate colors.
In the lower right of the image is text that reads "JD=". This indicates
the Julian Day used to generate the image. The Julian Day is the continuous
count of days since the beginning of the Julian period, and is used primarily
by astronomers. It appears here for debugging purposes.
In the upper left is a "Location" button. Pressing this will cycle through
the various location providers. Text in the upper left indicates the current
location provider. Not all providers are available on all devices, and
some providers may be disabled in the Android system settings.
The location providers are:
- best (let Android chose what is best for this device)
- fused (uses a combination of GPS and Network providers)
- gps (uses GPS satellites to determine location)
- network (uses Cellular of WiFi network)
- passive (only updates if some other app asks for location)
- manual (user selects location, see below)
The location provider can also be selected through the "Settings" button
(see below).
If the location provider is "manual", the location can be entered via latitude
and longitude on the Settings page, OR the user can press anywhere in the dial,
causing a graphic of the earth to appear, which can then be dragged to the
desired location. (see graphic below, as well as settings page instructions)
Also appearing along the bottom button row are the "<" and ">" buttons.
When the "Offset Provider" in "Settings" is set to manual, these can be used
to move the clock forward or backward, day by day. This is useful to determine
past or future event times.
In the lower left is a "TZ" button. Pressing this will cycle through
the various timezone providers. Text in the lower left indicates the current
timezone provider, and the timezone given by that provider.
The timezone providers are:
- system (use the timzeone of the Android device, regardless of location)
- location (use a static database to guess the timezone based on location)
- manual (user selects timezone, see below)
The timezone provider can also be selected through the "Settings" button
(see below).
In this example, the timezone provider is "system", which is providing the
"America/Los_Angeles" timezone. The two abbreviations for this timezone are
"PST" (for Pacific Standard Time) and "PDT" (for Pacific Daylight Time), and
the square brackets around "PDT" indicate that that is the actual timezone
currently in use.
In the upper right is an "Alarms" button. This feature is still under
development. (see the Alarms section below for more details)
In the lower right is the "Settings" button, which opens the settings
page shown below.
please refer to figure 2 on the left
This is the Settings page. Many features here are also available
on the main clock view. This page allows you to select various
information providers, as well as values to use when a provider
is set to "manual".
The "manual" setting for location will allow you to type in raw
latitude, longitude coordinates, OR you can type in a city name
and select from a drop down list of possibilities.
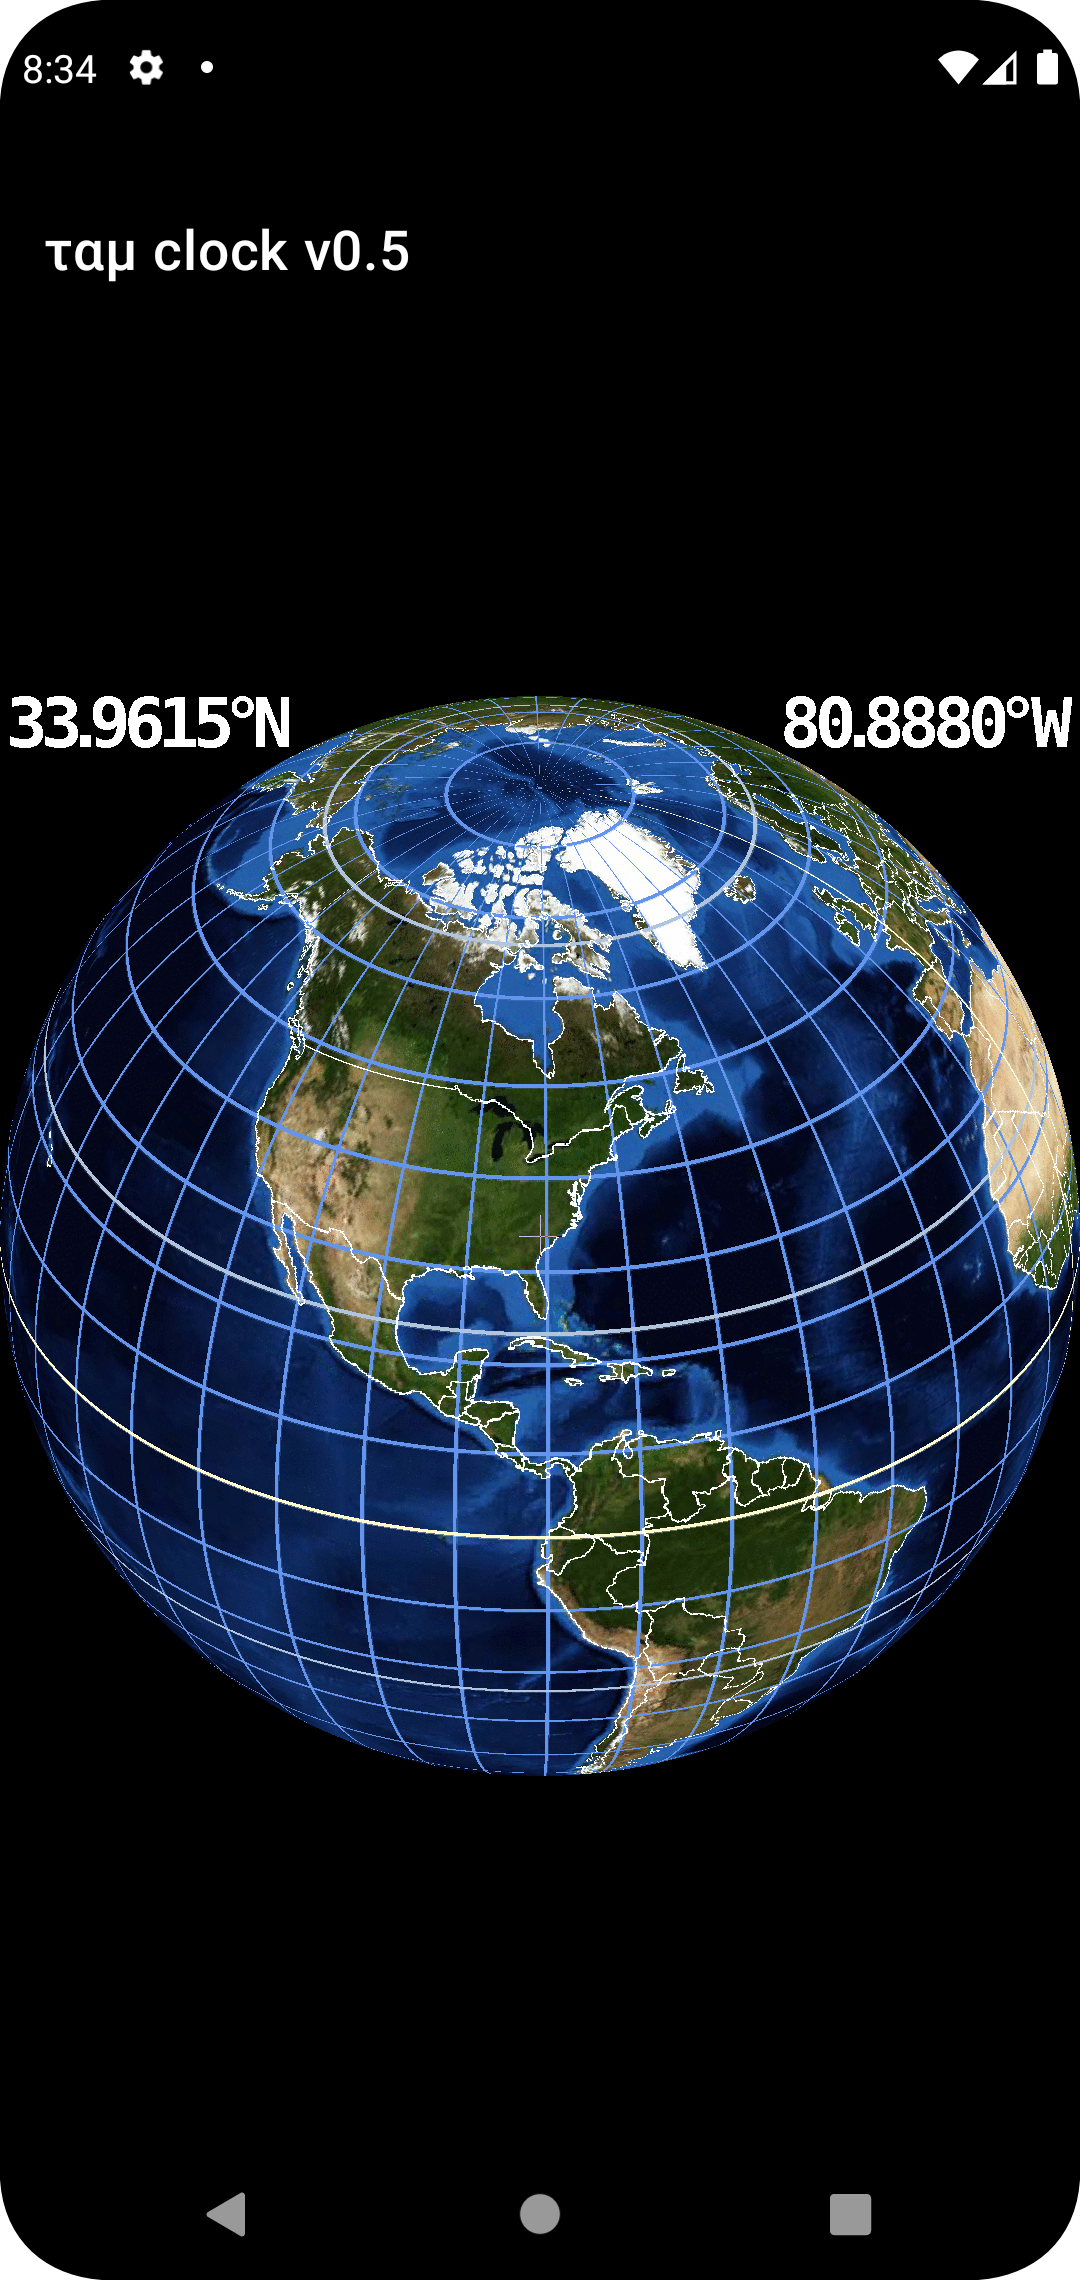
please refer to figure 3 on the left
This is the main clock view, when the location provider has
been set to "manual", and the user presses anywhere within the
clock dial. This view of the earth can be dragged to set
the desired "manual" location.
Latitude and longitude are shown along the top.
The location based timezone is also shown in the lower left.
[TODO: update figure 2 for v0.16]
Circumpolar objects
Because of axial tilt, things can get strange near the North and South Poles,
especially around the solstices.
Sometimes the Sun may not rise or set for days, depending on the
time of year. The same is true of the Moon and Planets.
They may be up for days on end, or never rise at all.
Alarms
Android does not really have a concept of a "repeating" alarm
that changes time every day. Because of this, alarms created in
the alarms page are created within the Android operating system
as single shot alarms. When a single shot alarm is dismissed,
it is auotomatically removed from the alarm clock app. Tauclock
runs a background task about once every half hour, looking for
alarms that have expired, and recreating new single shot alarms
in the future, with updated times.
For example, if you set an alarm for sunrise, a single shot
alarm will be created for the next future sunrise. When that
time occurs, and the alarm is dismissed, it disappears from the
Alarm Clock application, but it still persists within Tauclock.
Sometime within an hour or so after sunrise, Tauclock's background
task will wake up, calculate a new time for the next future
sunrise, and create a new single shot alarm with that time in
the Alarm Clock.
If you do NOT want the alarm to repeat, simply delete it in
Tauclock